How To Curate Tailored Audiences for Your Social Campaigns

How To Curate Tailored Audiences for Your Social Campaigns

Home > Digital Marketing How To's

How To Curate Tailored Audiences for Your Social Campaigns

When it comes to targeting users for paid social media activity, there’s an impressive variety of options. And those options only expand further when you look at each social media platform that has a paid aspect to their offering.

So, where on earth do you start when it comes to reaching your most relevant audience with your ads on social media?

In this blog, our Paid Lead, Yumna, runs you through all you need to know when it comes to identifying, building, and curating audiences for your social media platforms.

Let’s get started.

Identifying your audience

Your ads can be the most interesting and exciting things in the world but, ultimately, if they’re not being shown to the right audience, then you’re not going to see the results you want!

So, how do you find the right audiences?

Start by thinking about who your perfect target audience is and start to flesh them out. If these are new users who don’t know your brand, or users who you’re reaching with initial awareness ads, then you’ll need to be quite broad. Think:

  • What interests might they have?
  • What topics would engage them?

It’s also important to consider what platforms they’re most likely to be on. It’s likely that you’ll need to do research on this new target audience. You can use social listening tools and other data sources to flesh out these audiences and understand other things they might be interested in. Then, you should move on to your existing audiences and the data you have available on them.

This data can include info from your website (using GA4) or data about the followers of your social media profiles.

Once you’ve got a bit of an idea of who your audiences are, you can use this as the building blocks for building your targeting.

The common types of audience

Before we dive into looking at the unique audience targeting options for each social platform, let’s start by giving a broad overview of the most common types of audience you may encounter during the research and targeting phases.

Depending on the position in the funnel you are focusing on, there are usually three distinct audience types.

Which audience type to use & when
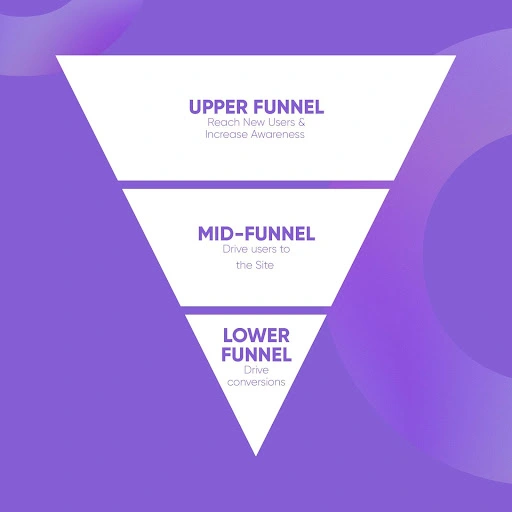
 

The marketing funnel and associated audiences.

For top-of-the-funnel campaigns focused on awareness and reach, you’ll want to use broader audiences. This is where platform audiences are your best option. But you can also use lookalike audiences of users who have previously completed a high-value action like a purchase or filled in a lead form.

For middle-of-the-funnel campaigns focused on traffic or engagement, you’ll want to use more refined versions of those initial platform audiences and lookalike audiences. You may also want to use a custom audience of users who have completed lower-value actions like watching a video used in one of your awareness ads or users who like your FB/IG/LinkedIn page.

But for bottom-of-the-funnel activity, you’re better off primarily using custom audiences. These are audiences made up from the data you provide. So, this can be website visitors, a database of newsletter sign-ups, people who follow your Facebook page, and so on. This is because these are users who have expressed interest and are more likely to complete a high-value action like a purchase.

Audience options for each platform

Now that we know the basics, let’s examine what each social media platform offers in terms of audience targeting options.

Location, age, and gender demographics are audience targeting options across most platforms which can be combined with other types of targeting on the platforms.

Meta

When it comes to audiences on Meta, there are three options:

1. Core Audiences: Including demographics, interests, and behaviours.

2. Lookalike Audiences: These are new users who are similar to people in your existing custom audiences. Find out more about Meta Lookalike Audiences here.

3. Custom Audiences: Users who have already engaged with you by visiting your website, watching your video, or engaging with your Facebook or Instagram page.

Meta’s core audiences

To give a little more insight into those fundamental core audiences:

  • Demographics: Reach people based on education, employment, household and lifestyle details.
  • Interests: Reach specific audiences by looking at their interests, activities, the Pages they have liked, and closely related topics.
  • Behaviour: Reach people based on purchase behaviour or intent, device usage, and more.

Meta special ad category targeting

Lastly, if your campaign utilises a special ad category, it’s worth noting that it can impact your audience targeting, typically limiting the options you have available to ensure that you aren’t discriminating against users

LinkedIn

When it comes to ad targeting on LinkedIn, there are three main types of audiences:

  • Matched Audiences is their suite of targeting features that empowers you to reach your target audience with your own data.
  • Lookalike Audiences can be built from existing matched audiences.
  • Audience Attribute targeting, which is derived by LinkedIn member profile data and behaviour.

LinkedIn targeting by attribute

People typically use LinkedIn professionally (a bit like an online CV). So that means it’s accurate, up-to-date, and full of detailed demographic information, making it easy for you to target users based on the following:

🏢
by company
👴
by demographic
🎓
by education
👩‍✈️
by job experience
⚽️
by interests

Find out more about how to conduct audience research on LinkedIn in another of our resources.

Reddit

Reddit gives you the option to choose from two different audience types:

1. Custom Audiences: Made up of website retargeting, customer lists, and engagement retargeting (This refers to users who have engaged with or seen your ads, or watched your videos).
2. Reddit Audiences: Made up of communities, interests, and keyword targeting (beta).

Reddit audiences

There are three different types of Reddit Audiences to choose from:

  • Communities – Target users based on communities (also referred to as subreddits) they’ve subscribed to.
  • Interests – Target users based on their interests, determined by content they’ve recently interacted with (including Reddit communities).
  • Keyword Targeting (beta) – Target users who view content containing keywords that you define.

TikTok

TikTok gives you the option to choose from three different audience types:

1. Custom Audiences: Target users who have Customer File, Engagement, Website Traffic & more.
2. Lookalike Audiences: New users who are similar to people in your existing custom audiences.
3. Interests & Behaviours: Made up of Hashtag Interactions, Interests, Creator Interactions, and Video Interactions.

There are four different types of TikTok audiences to choose from:

  • Interests: Target users based on their interest in specific content
  • Video Interactions: Target users based on the videos they engaged with, in the last 15 days on TikTok.
  • Creator Interactions: Target users based on the creators they followed or viewed on TikTok.
  • Hashtag Interactions: Target users based on the hashtags they’ve viewed on TikTok.

How to build target audiences on each platform

Now that we’ve explored the different targeting options, let’s dive into the specifics of actually building these audiences in each platform.

Building audiences on Meta

When building your Meta platform audience, you can select your target location, age, gender, language, and detailed targeting.

You can also utilise the narrow function so that users have to qualify for two different types of detailed targeting options. For example, you can target users who have to be interested in yoga and meditation.
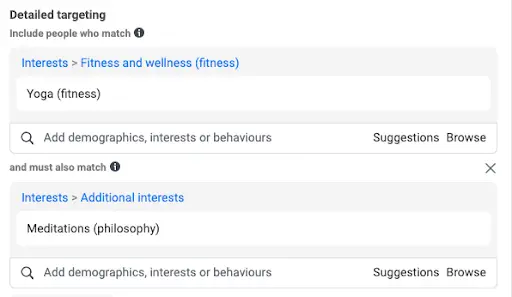
detailed audience targeting

Building audiences on LinkedIn

When building your LinkedIn platform audience, you can select your target location, language, and attribute targeting. When setting up your target audience, Campaign Manager will provide you with the option to customise your audience using the ‘AND’ or ‘OR’ targeting criteria.


  • You can use the ‘AND’ feature to further refine your targeting criteria by narrowing your audience.
  • You can use the ‘OR’ feature to increase your audience to members who meet at least one of your criteria.
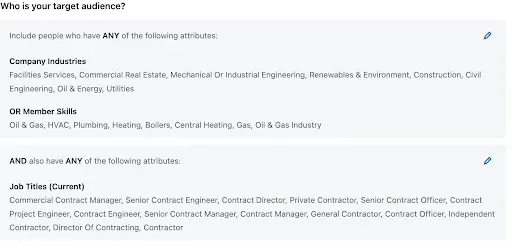
linkedin target audience

Building audiences on Reddit & TikTok

When building your Reddit platform audience, you can select your target location, and your Reddit platform targeting.

When building your TikTok platform audience, you can select your target location, age, gender, language and platform targeting options.

Audience creation best practices

Lastly, let’s put all that together into some best practices for you.

1. Don’t stick to what you think is best

It’s a good idea to have a few different audiences that you want to build and target with your ads. Why? Because this gives you options for testing as well as allowing you to reach more users with your ads rather than who you presume your target audience is.

2. Avoid running similar audiences at the same time

If you use very similar audiences in the same campaign or even across the same account, your ads may end up competing against each other which can result in higher cost per metrics and can be a waste of spend!

3. Try not to be too niche

Having super refined, niche audiences —particularly for top-of-the-funnel activity— might mean that you’re missing out on a whole load of users. It will also drive the frequency of your ads up and show your ads to the same users again and again. This is why it is always important to start off super broad and refine as you go. Digital marketing isn’t an exact science, it’s all about testing.

4. Small budget? Start refined

That being said, in the case that you have a small budget, use it wisely! You can still test new audiences and target slightly broader audiences, just do it in stages and refine as soon as you have enough information to inform your choices!

5. Don’t forget about your content

Once you’ve figured out your audience and how you’re going to target them, you need to start thinking about how you’re going to engage them and get their attention.

Your ad copies and creatives should be heavily influenced by who your audience is.

6. Utilise audience expansion options

Most platforms will give you the option to expand your audiences beyond your targeting where it makes sense. So, it’s worth ticking these options as it can help the system get smarter and show your ads to users outside your targeting when it will get you more results!

7. Exclude custom audiences

When targeting platform audiences or lookalike audiences, exclude custom audiences of users who have already completed high-value actions like purchases in the past 30 days so you don’t waste your budget reaching people who have already converted.

One of the best pieces of advice would be to use the “exclude” filter to your advantage. While you might have carefully selected your targeting options, chances are there are still attributes that aren’t as relevant that are being targeted by your campaigns. By excluding them, you can ensure that your audience is refined and specific.

Need help with your audiences?

From paid social to PPC, our expert team of Giants are always on hand to offer advice when it comes to getting those audiences right. Contact us today to discuss your targeting goals and wider business marketing objectives.

Keen to keep learning? Stay up to date with our expert-led Marketing Leadership Series and blog.

Blog

Giant Wednesday

Amplify Your LinkedIn Activity: How To Boost LinkedIn Posts

Amplify Your LinkedIn Activity: How To Boost LinkedIn Posts

Home > Digital Marketing How To's

Amplify Your LinkedIn Activity: How To Boost LinkedIn Posts

With over 900 million members from 200 different countries across the globe, it’s safe to say that LinkedIn is the top professional platform out there — by far. In fact, LinkedIn’s realm of influence has even started to reach beyond the professional in recent years, attracting the likes of A-list celebrities like Ryan Renolds and Jennifer Lopez (yes, really).

Having long since evolved from an “online CV” function, LinkedIn is now a colossal network brimming with opportunities for businesses and brands to showcase themselves and spread their messaging far and wide.

When learning to navigate such a saturated, thriving platform, you may well be wondering, “How can I make my voice heard?”. Well, today, we’ll be spilling the beans about boosting your posts on LinkedIn so that your message reaches its intended audience and gets the engagement it deserves.

Let’s get started by tackling some of your most-asked questions, shall we? Continue reading the blog below or watch our helpful YouTube video for all the answers you’re after.

What does boosting a LinkedIn post mean?

So, what’s the scoop on boosting, you ask? Well, boosting a post on LinkedIn is like giving it a turbocharged rocket boost. It’s all about taking that little gem of a post and unleashing it upon the world in a glorious display of visibility!

Boosting your post not only ensures that your loyal LinkedIn followers see it, but it also allows your brand’s content to reach people who may not be connected to your page. Yes, you heard that right – your post has the potential to captivate a whole new crowd of eager readers.

Boosting post VS running ads on LinkedIn

First things first, boosting a post is like taking the express lane to advertising heaven. It’s simple, it’s straightforward, and it’s perfect for those who prefer a pinch of convenience in their marketing endeavours. With just a few clicks, you can give your post a little boost of visibility. Easy peasy, right?

In comparison to running an ad, boosting a post will give you a compact selection when it comes to targeting your audience, setting objectives, and choosing placement types. But don’t be disheartened by the restricted choices. Sometimes, simplicity is best. Depending on your goals, boosting a post might be the perfect strategy for you. It’s all about picking the right tool for the job!

How to boost a post on LinkedIn

So, you’ve got a post that’s ready to shine. Here’s how you can give it the boost it deserves in just 10 simple steps:

Step 1: Open up the admin view of your LinkedIn page and locate the post in your feed. It’s time to put it in the spotlight!

Step 2: Above the post, you’ll find a button that says “boost.” Click it, and watch as the magic unfolds in the next window.

Step 3: Now, it’s time to set your objective. Do you want to increase awareness of your post or ignite engagement among your audience? Choose the option that best aligns with your goals.

Step 4: Select the type of audience you want to target. Will you go with the profile-based approach, taking into account factors like job function, industry, and seniority? Or maybe the interest-based route, analysing the groups they’re involved in? You can even opt for a LinkedIn audience template or a saved audience you’ve crafted earlier.

Step 5: Refine your audience further, depending on the type you selected. Fine-tune the location and exclusions to ensure you’re reaching the right crowd.

Step 6: Get ready for some advanced options! Consider enabling automatic audience expansion to show your post to similar audiences and utilise the LinkedIn audience network, which expands your reach by running ads on partner apps and websites, reaching 25% more people.

Step 7: Set the start and end date for your boosting campaign.

Step 8: It’s budget time! Determine the lifetime budget you’re willing to invest in your boosted masterpiece.

Step 9: Select the ad account to bill. You can either choose from existing options or let LinkedIn create a shiny new one just for you.

Step 10: Take a peek into the future. Check out the forecasted results and preview to ensure everything looks fabulous. And when you’re absolutely thrilled with what you see, go ahead and hit that glorious BOOST button!

Enjoy LinkedIn success

Congratulations, my savvy booster! You’re now armed with the knowledge to amplify your LinkedIn presence like a pro. So go forth, boost your posts, and let your content shine!

If you’ve enjoyed this piece, we’re here for you every week with Giant Wednesday content and regular blog posts. Or, if you have any questions about your social media platforms, don’t hesitate to get in touch with our team of expert social media marketing professionals!


Want to know more?

Reach out and say hello. Come experience the GIANT side.

Sign Up For Giant Wednesday In Your Inbox


Use the form below to sign up and we’ll send you fortnightly update emails when a new episode of Giant Wednesday is launched.

Blog

Giant Wednesday

Sign Up For More

Stay up to date with the latest happenings, learnings, events & more with our GIANT Newsletters.

Contact Us

Top Floor, The Civic Centre, Castle Hill Avenue, Folkestone CT20 2QY.

 Show me directions

 01303 240715

 Send us a message

Copyright © 2022 Sleeping Giant Media. All Rights Reserved.

How To Optimise Images For Your Website

How To Optimise Images For Your Website

Home > Digital Marketing How To's

Everything You Need to Know About Optimising Images for Your Website

Struggling with slow loading times? Do you find your visitors clicking out before you’ve even had the chance to tell them about your incredible products or services?

Well, sadly, those beautiful, high-quality images on your homepage may be doing you dirty. One of the most common causes of slow page speeds is having images that are too large or that aren’t optimised correctly for online use.

It’s no secret that online audiences have super short attention spans, and with an unimaginable amount of content just a click away, they don’t have to wait around and see what you have to offer. They can find someone else, who’s site loads quicker and easier.

Although a 6K, 10-photograph slider of your products on your homepage may look impressive – to you, anyway – it can take up to 20 minutes to load and, by that time, potential customers may have left your site. And if customers are leaving before you’ve even had a chance to show them what you do best, then something’s gone horribly wrong.

What is image optimisation?

According to Adobe, “Image optimisation is all about finding the sweet spot between image data — which can slow down page load times — and image quality, which can enhance a brand or website visually.”

Ultimately, it’s all about tweaking image size, quality, and formatting of images, with the goal of improving your website performance.

When it comes to optimising your images, it’s important to pay attention to every detail. Even before you start taking photos or uploading images, there are certain considerations to keep in mind. A crucial factor in the world of SEO is having the right images on your site, and this goes beyond file size and format – the actual content of the image matters, too.

A well-chosen image can have a significant impact on your search engine rankings, so it’s important to choose one that is relevant to your page, emphasises your key points, and enhances the user experience. By taking the time to select the right image, you can give your website a boost in both aesthetics and SEO. And who doesn’t love a win-win?

Keep in mind that using your own photos is preferable, as people can usually spot stock images – and may perceive them as insincere or unauthentic. And, while using stock photos may not affect your rankings, as long as the image is relevant to your content piece, it’s important to use them strategically, and use original imagery wherever possible.

In a recent study by Referral Rock, respondents say stock images stand at 5.76/10 for communicating what a brand stands for. In contrast, original images got a whopping 9.33 out of 10 for effectively communicating what a brand stands for – showing just how impactful an original image can be.

So, if you have an image that seems too good to be true, like a group of young professionals laughing over a spreadsheet, consider switching it out for something more authentic. Your audience will appreciate it.

Size does matter

It’s crucial to make sure your website design is responsive, meaning that the design adjusts to fit the user’s screen – and this includes images. If you’re using WordPress, all images are responsive by default, so you don’t have to worry.

Having high-quality images on your website is important, but it’s equally important to keep their file size small without sacrificing their quality. This is where file compression comes in. You also want to make sure that your images avoid exceeding 2560 pixels in width, as this is the standard resolution for larger monitors.

By taking the time to compress your images and optimise their file sizes, you can improve your site’s load time and keep your visitors hanging around for longer. So, take advantage of the many free tools available to you, experiment with different compression levels, and find the perfect balance between image quality and file size for your website.

Some of the best options when it comes to tools are:

Google’s PageSpeed Insights tool is the best way to identify the images causing any optimisation issues, then you can use the other tools to compress and resize your images, before uploading them.

For WordPress users, there are handy plugins like Resize Image after Upload and Imsanity that can automatically resize your large image uploads – another win for the WordPress crew.

How do you name images?

Now we know about image sizing, when it comes to naming that shiny new resized image, avoid generic names like “employeephoto1.jpg”. Instead, opt for more descriptive ones like “man-smiling-with-computer-and-plants.jpg”.

Giving your website’s images a more descriptive name makes it easier for search engines to understand what your images are about, and can also help visually impaired users who rely on screen readers.

In the same vein, you should optimise your image alt tags. These tags describe your images to search engines and screen readers, so it’s important to describe your images accurately – without overloading them with keywords.

Think about how you would describe the image to someone who can’t see it when creating your alt tags. By following these tips, you can ensure that your images are properly named and optimised for both search engines and users.

Last step? Let’s talk file formats

While you’re saving your images, a final consideration should be around the file format. When it comes to choosing the right file format for your images, being confronted with the jumble of acronyms can be confusing if you’re not familiar with what they mean. But fear not, we’re here to help.

The most common formats are:

  • JPEG
  • PNG

JPEGs are the way to go for most images, as they’re lightweight and easily compressed. However, if you need images with transparent backgrounds, then PNG is your best bet.

SVG is the go-to format for logos and icons, as it takes up minimal space and can be resized without losing quality.

If you’re creating logos or icons, you’ll need Adobe Illustrator to save them in SVG format, or you can use an online SVG converter. We’d recommend being cautious, however, as the results may vary.

Go forth and optimise

So, now you know that optimising images for your website is crucial for enhancing user experience and improving page speed.

Using the right image, file dimensions, compression, naming conventions and formats are all crucial steps on the journey to achieving this – and will help improve the loading speed of your website,  enhance user experience, and stop your audience reaching for the ‘back’ button before you’ve had a chance to show them what you can do.

If you have any further questions about image optimisation or site speed, get in touch with our friendly team today. Or, keep up with our blog for more strategic digital marketing insights in the meantime.


Blog

Giant Wednesday

Sign Up For More

Stay up to date with the latest happenings, learnings, events & more with our GIANT Newsletters.

Contact Us

Top Floor, The Civic Centre, Castle Hill Avenue, Folkestone CT20 2QY.

 Show me directions

 01303 240715

 Send us a message

Copyright © 2022 Sleeping Giant Media. All Rights Reserved.

How to pick a good SEO Company

How to pick a good SEO Company

Home > Digital Marketing How To's

How To Pick A Good SEO Company


Any business out there with an online presence needs to consider SEO optimisation for its website and online posts. But, if you don’t have the right tools to do this yourself, how do you choose the right SEO company to do this for you?

Well, we can help you go through some of the main things to consider when you are narrowing down your search for an SEO agency to help your business grow!


What is an SEO Company?

First, let’s quickly define SEO!

SEO or Search Engine Optimisation is the process of creating content for your website that is designed so Search engines (like Google or Bing) can easily find it, index it and display it to users in their SERP (Search Engine Results Page) that are relevant to their query or question. 

An SEO Company or Agency is an organisation who specialise in analysing, strategising and creating optimised content for your business to increase and improve the traffic coming to your website. Ultimately, the aim is to rank your website as high as possible on the SERP and increase traffic, clicks and conversions for your website.

giants smiling at work on laptops

What to consider when choosing an SEO provider:

1. What SEO Services Do They Offer?

The first step is to question if the SEO agency offers the right services for your needs. If you need a new site and website migration, but the company you’re looking at doesn’t offer migration services, then they are obviously not the right company for you!

Some examples of SEO services are: 

  • An SEO Audit
  • SEO Strategy
  • Keyword Research
  • Website analytics and tracking
  • UX/UI design
  • Technical SEO (On page vs Off page)
  • Web Development/Website Migration
  • Copywriting

If you’re not sure of what services you need, get in touch with some SEO experts or companies that are offering an SEO audit. This can give you some invaluable insights into how your website is currently performing and highlight any issues. 

At Sleeping Giant Media, we offer a free mini SEO audit to help get you started. We will look at elements such as backlinks, domain authority, meta data, keywords, loading speed, on page content and SEO errors! Not bad for a few clicks eh? 

2. Get To Know The SEO Experts

Having conversations and meetings with the team of SEO experts you could be working with is really important. Make sure the people in the company:

  • Match your values
  • Show the same amount of passion for your website/product/service, as you do.

A good relationship with the people handling your website’s optimisation is key to ensuring the smooth running of tasks and overall communication. It’s also important to ask questions to make sure you know as much as possible about the companies you’re considering working with.

Some key questions to ask could be:

  • Do they have account managers? 
  • How do they run their projects and work to deadlines? 
  • How knowledgeable are they? Are they truly experts within their field? 
  • How much experience do they have working with clients in similar industries or sizes?
  • How involved will we be in the process/strategy building? 
  • How regularly will we have contact with you?

Another thing to do is check out any previous testimonials or speak to clients they have worked with before to see evidenced results and get an honest opinion on what the company was able to do for them.

courtney smiling at jamie holding mug

3. SEO Service Pricing

This one might seem obvious, but you really have to consider the price of the service they are offering. Some companies will offer their services at a higher price compared with others, however, there might be a reason for that.

Larger agencies may cost more money, but they tend to have more resource and are capable of handling larger campaigns. Smaller companies will be able to work to a tighter budget and can be eager to please, however may not have the capacity to work on larger campaigns.

For example:

Sleeping Giant Media offers its SEO services at a higher price to The Spark Agency (their sister brand). This is due to Spark offering their services to smaller, local companies who will have a smaller budget compared to the services for larger organisations that Sleeping Giant Media provide.

4. Know your goals

Like any task, when choosing an SEO agency, you need to make sure that you have set clear and measurable goals for what you want to achieve from your investment. Maybe you’re looking to launch a specific campaign, increase traffic to your website, improve your rankings or even the user experience/UX. 

Make sure you have considered what Key Performance Indicators (KPI’s) you will be using to measure your success and ensure that your chosen agency is clear on what they will be reporting to you and how often. 

Setting a realistic budget for your goal will allow you to better understand the results you can expect to see, as SEO can be a long process and you may not see immediate results overnight. 


There are so many factors to consider when choosing your SEO agency and taking the plunge. But it will all be worth it once you reach your ultimate goal!

Luckily, Sleeping Giant Media and The Spark Agency will have your back every step of the way. 

Start your SEO journey with us by getting in touch with an SEO expert so we can support you in your decision making process.

Blog

Giant Wednesday

Sign Up For More

Stay up to date with the latest happenings, learnings, events & more with our GIANT Newsletters.

Contact Us

Top Floor, The Civic Centre, Castle Hill Avenue, Folkestone CT20 2QY.

 Show me directions

 01303 240715

 Send us a message

Copyright © 2022 Sleeping Giant Media. All Rights Reserved.

How To Create Whatsapp Stickers

How To Create Whatsapp Stickers

Home > Digital Marketing How To's

Creating Stickers In Whatsapp


Calling all you creatives who love to have a natter with your mates on Whatsapp!

Let’s face it, we all use Whatsapp these days, what even is iMessage? Haha, I’m joking, we still love you iMessage (but we love you more Whatsapp). So, with so many of us now on this meta platform, why don’t we have a bit of fun with it and get a bit more creative with our messages?

Why do we want Whatsapp stickers?

Sending the same emoji’s over and over, can get a little dull,l right? Well, we can actually send stickers instead! And by this I don’t mean the standard ones your phone automatically pops up for you like the poop emoji or the pig, I mean custom stickers that you have chosen!

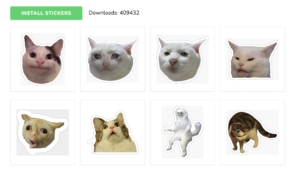
cat images sticker pack

Image source: getstickerpack.com – cat meme sticker pack

 If you download getstickerpack from your app store, you can spice up your sticker game with custom sticker packs where you can actually upload images from your own photo library and cut them out yourself! Then it’s as simple as adding your fun, creative WhatsApp stickers to your WhatsApp library and sharing them with your friends. You can’t get much easier than that, can you?

So let’s break it down into a step-by-step “how to create a WhatsApp sticker” shall we?

How to create a Whatsapp sticker pack:

1 – Download the get sticker pack app from your app store.
2 – Name your sticker pack to get started!
3 – Add the stickers you want from your photos (you can select up to 30 in 1 pack).
4 – Cut out those images to be the sticker of your dreams – if you’re a crazy graphic designer/creative, you can also use transparent PNG files.
5 – Add your sticker pack to your WhatsApp.
6 – Send your new stickers to all your favorite people!

are you a graphic artist

Image source: getstickerpack.com

Also, it doesn’t end here. If you are a creative genius and looking to get your homemade stickers out there, you can publish them to the sticker maker community and they have a chance of going viral from so many users using your sticker designs, how cool is that? So not only does this app give you more creative freedom with your Whatsapp messages, but also gives your sticker design a chance to be used millions of times.

Whatsapp stickers are a fun way to communicate with your friends and family, so why not give them a try rather than a basic emoji? Create stickers for Whatsapp today and brighten up your best friends’ day with a fun sticker you’ve made for them.

How we can help you!

Don’t forget, at Sleeping Giant Media, we are a company full of creative people here to help you fulfill your company’s needs through SEO, PPC, Content, and much more. So get in touch with an expert today, so we can help you and your business!

Blog

Giant Wednesday

Sign Up For More

Stay up to date with the latest happenings, learnings, events & more with our GIANT Newsletters.

Contact Us

Top Floor, The Civic Centre, Castle Hill Avenue, Folkestone CT20 2QY.

 Show me directions

 01303 240715

 Send us a message

Copyright © 2022 Sleeping Giant Media. All Rights Reserved.

How To Optimise Images For Websites

How To Optimise Images For Websites

How To Optimise Images For Your Website

Home > Digital Marketing How To's

Digital Marketing, technology & business insights, how-to’s and explainer videos, released on a Wednesday. Make sure to subscribe to be notified and sign up for our mailing list! 🎥

See below, the transcript from this episode of Giant Wednesday if videos aren’t your preferred method to consume digital skills.

If you want to know more, get in touch today 😎

Having trouble with your site speed? You know a pretty common cause for this is having images that are waaay too big on your site.

Yes, it’s amazing that you have a 6K photograph slider of your product on your homepage, but if it takes 20 minutes to load, no one will be around to see it.

So what can be done? Well, I’m Alex, and today we’re going to be talking about optimising images for your website in this episode of Giant Wednesday.

So let’s start before you’ve even picked up the camera.

Use the Right Image

Before we even mention file size, format, or anything like that – it’s important for your SEO that your images themselves are the best they can be.

It can have more of an effect on your SEO than you might think!

A good image for your site will be relevant to your page, emphasising your key point and enhancing your user experience.

If you can, try to use your own photos, because I promise you – people can spot Stock Images from a mile away, and they don’t like it!

And that’s not just me saying that in fact, a debt company saw a 35% increase in sign-ups when they replaced a stock image on their homepage with a photo of their founder.

So, if there’s that too good to be a true photo of a team of young beautiful looking people laughing over a spreadsheet on your page, take this as a message to change it to something a bit more authentic.

Okay so now you have the right picture, let’s talk about…

Use the right File Dimensions

Now that you have your photograph, image or even graphic, don’t just go uploading that straight into your site, you’ll need the image to be the right dimensions.

There’s no one-size-fits-all approach (get it) to image dimensions for your site, as it depends on your page design and layout. 

Here are a few tips on the right things to do:

  • Make sure your website design is responsive

If it’s not already – you’ll really want to take care of this quick. This just means that the design of your website changes automatically to fit the user’s screen, be it a mobile phone or tablet, including your images.

If you’re using WordPress, all images that you upload are responsive by default!

  • Don’t Exceed 2560 pixels wide

2560 pixels is the standard resolution width for 27″ and 30″ monitors, so there will never be any real reason to exceed this dimension. 

You can make the image size whatever height works for your site design, but remember that bigger dimensions normally mean they’ll take up more space.

But how do get small file-size images on your site without sacrificing quality and having a pixelated mess? Let’s talk about the next part:

Reduce your File Size

File compression is key to having high-quality images on your site that don’t take up Gigabytes of space.

You can use tools like Google’s PageSpeed Insights tool to check out the files and images on your webpage that are the heaviest and then look at reducing these file sizes to improve page speed. 

If you’re using WordPress for your site, there are some awesome plugins such as Resize Image after Upload and Imsanity which automatically resize your large image uploads. Pretty handy right?

But sometimes the prevention is better than the cure, so let’s walk through the steps for compressing your images for the best quality,

There are loads of free tools you can use to resize your images before you upload.

These include TinyPNG, Optimizilla, or the free version of Kraken.

These sites reduce your image’s file size with only a negligible effect on the quality of your images. 

You’ll want to aim to compress your images to around 100 KB, or under 200 KB for full-width images, so have a play around with those tools and find the right balance between quality and size.

Of course, you’ll be able to get away with a few medium-sized images if that is absolutely necessary, but there’s no reason to have a large file sitting on your site and clog up your load time if you can do something about it.

If you’re using Photoshop, you can do this yourself. You can resize your image with Image > Resize, or alternatively, you can create a new document with your required dimensions and drop your image into that.

You’ll then want to click File > Save for Web [Legacy] where you can play around with the compression options, whilst seeing a preview of what the image looks like, and the file size in the bottom left corner.

We’re racing through these so let’s check out our penultimate point

Name your Images

So you’ve found the right file dimensions and size that work for you – now don’t get ahead of yourself and save an image like this as:

employeephoto1.jpg

Instead, use descriptive keywords separated by hyphens, such as man-smiling-with-computer-and-plants.jpg

Another good tip is to optimise your Image Alt Tags.

These help web crawlers figure out what your images are about, and they’re also used by screen readers to describe the image to visually impaired users. 

Describe your images well without overstuffing keywords. A good best practice is to think of how you would describe the image to someone who can’t see it.


Using Correct Image Extensions

If you don’t know your PNGs from your JPEGs, this step could leave you stumped.

When in doubt, you should always choose the JPEG file format for your images. These are light in file size and easy to compress.

If you’re after images with transparent backgrounds, you should use the PNG format.

For logos and icons, use the SVG format. These take up minimal space and can be resized as needed on your site.

You will need Adobe Illustrator to create and save logos into an SVG file format or use an online SVG converter, but be wary that results will vary drastically!

If you want more information on how to make logos, let us know in the comments section, and we’ll see what we can do!

With all of these, just make sure you’re watching the file size, making sure not to exceed the size we outlined in our previous step.


So there you have it – that should be everything you need to give your website a long-overdue diet. So the next time your site steps on the scales, it’ll be the biggest loser (in a good way).

Sign Up For Giant Wednesday In Your Inbox


Use the form below to sign up and we'll send you fortnightly update emails when a new episode of Giant Wednesday is launched.

Want results like these?

So, you’ve seen how we do it — and you know what we’re capable of. If your brand or business could benefit from results like these, get in touch with us today to unleash your potential.

Sign Up For More

Stay up to date with the latest happenings, learnings, events & more with our GIANT Newsletters.

Contact Us

Top Floor, The Civic Centre, Castle Hill Avenue, Folkestone CT20 2QY.

 Show me directions

 01303 240715

 Send us a message

Copyright © 2022 Sleeping Giant Media. All Rights Reserved.